Aug 17, 2023 | Alabama Blogs, Georgia Blogs, Pest Control
By Anna V., Editorial Lead — Pest Education · Last updated: May 2026
If you’d rather keep spiders out of your house without spraying chemicals everywhere, you have real options. At Northwest, we get asked about natural spider repellent methods constantly, especially from homeowners with kids, pets, or asthma in the household. The honest version most homeowners don’t hear: most “natural” spider repellents work somewhat, briefly. The methods that hold up long-term are the ones that change the conditions spiders need to survive indoors, not the ones that try to scare them away with scent.
Here are the natural spider repellent methods worth your time, the DIY sprays that actually do something, and the prevention work that does most of the heavy lifting in a Georgia or Alabama home.

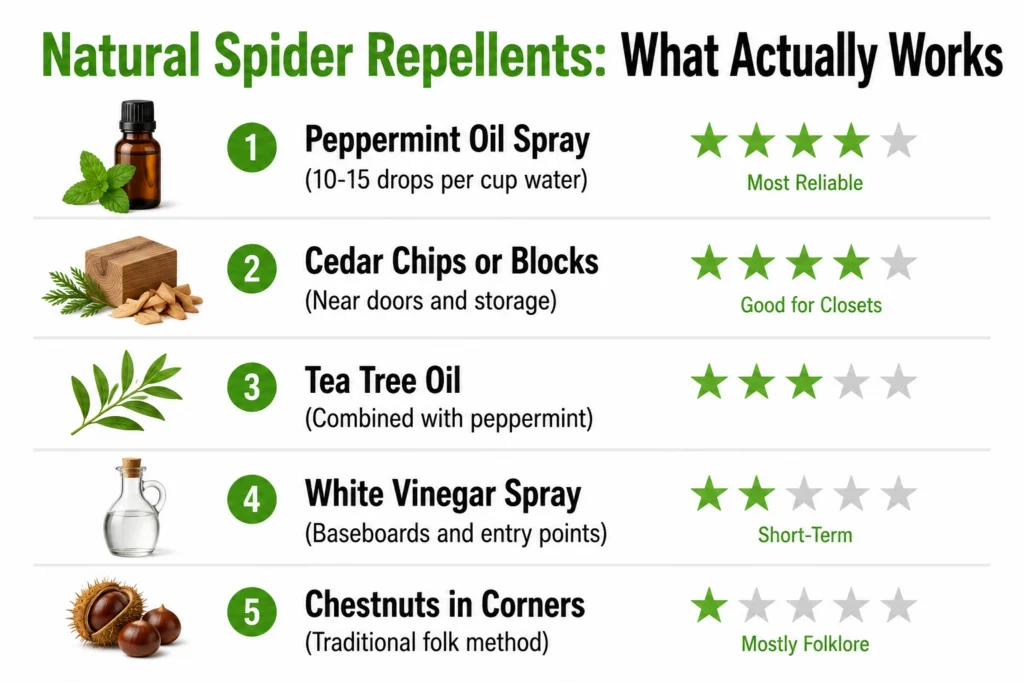
A peppermint and tea tree oil spray is the most common natural repellent and the most effective when used consistently.
Why Use Natural Spider Repellents?
Natural spider repellents have real advantages over conventional pesticides for many Southeast homeowners:
- Chemical-free options. Avoid synthetic pesticide residue indoors, which matters more in homes with kids, pets, or anyone with respiratory sensitivities.
- Safer for pets. Most ingredients (with a few exceptions noted below) won’t harm dogs, cats, or smaller pets if accidentally encountered.
- Eco-friendly. Less impact on beneficial insects, pollinators, and local ecosystems.
- Easier on indoor air quality. No off-gassing of synthetic compounds.
The honest caveat: natural repellents work best for prevention and for managing small, occasional spider activity. They rarely eliminate an established indoor population on their own. For larger infestations or venomous species like black widows or brown widows (see our spiders in Georgia guide for identification), professional pest control is the safer and more effective path.
Common Natural Spider Repellents (and How Well They Actually Work)
Essential oils and cedar do most of the work. Chestnuts are mostly folklore.
Essential Oils (the Most Effective Natural Option)
Several essential oils show real research-supported spider-repellent activity. The compounds in these oils interfere with spider chemoreception (their ability to navigate using chemical signals), which discourages them from establishing in treated areas.
- Peppermint oil. The most well-studied natural spider repellent. Mix 10 to 15 drops per cup of water in a spray bottle. Apply to corners, windowsills, entry points, and baseboards weekly. Strong scent dissipates within 5 to 7 days, so consistency matters.
- Tea tree oil. Combine with peppermint for a stronger combined effect. Mix 5 to 10 drops per cup of water. Has the bonus of mild antibacterial properties.
- Citrus oil (lemon or orange). Spider-repelling effect is moderate. Some homeowners prefer the scent. Apply same way as peppermint.
- Eucalyptus oil. Repels several arthropod groups including spiders. Use 8 to 12 drops per cup of water.
- Cedarwood oil. Different from cedar chips (below) but works on a similar principle. Spray version is more targeted than physical cedar.
Pet safety note: Tea tree and eucalyptus oils can be toxic to cats and small dogs if ingested directly or applied to skin. Diluted spray on baseboards is generally safe once dry, but don’t spray directly on pets or where they regularly lick. Peppermint and citrus oils are safer pet options.
Household Items
- White vinegar. Mix equal parts water and white vinegar in a spray bottle. Apply along baseboards, in corners, and around entry points. Acetic acid is mildly off-putting to spiders. Effect is short-term (24 to 48 hours per application) and the vinegar smell is noticeable to humans too.
- Cedar chips or blocks. Cedarwood naturally contains compounds that repel many arthropods. Place chips or blocks in closets, near doorways, in storage bins, and in basement corners. Effective for several months per application. Refresh by lightly sanding the surface every 3 to 4 months to release new aromatic compounds.
- Chestnuts. A traditional folk method: placing fresh chestnuts in basement corners and near windows. The active compound (chestnut tannins) does show some spider-repellent activity in laboratory testing, but real-world effectiveness in a home is modest at best. Treat as a supplement to other methods, not a primary strategy.
- Diatomaceous earth (food-grade). Not strictly a “repellent”. It kills spiders that crawl through it by damaging their exoskeleton and causing dehydration. Apply a light dusting along baseboards and at entry points. Reapply after vacuuming or moisture exposure.
DIY Spider Repellent Spray Recipe
The most reliable natural spider repellent recipe we recommend:
- 2 cups of water
- 15 drops of peppermint essential oil
- 10 drops of tea tree essential oil
- 1 teaspoon of dish soap (helps the oils mix with water)
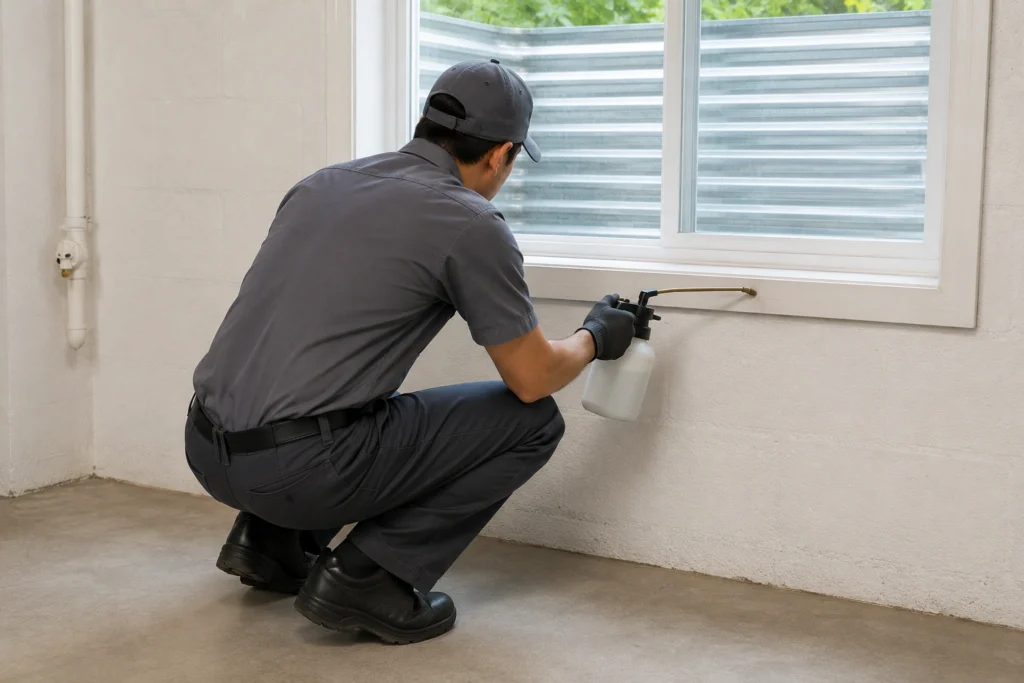
Combine in a glass spray bottle (essential oils degrade plastic over time). Shake well before each use. Apply to spider-prone areas weekly: window frames, door thresholds, baseboards, ceiling corners in basements and garages, and around outdoor entry points.
Adjust for sensitivities: drop the tea tree oil if you have cats. Substitute eucalyptus or citrus oil for variety. Don’t apply directly to fabric, finished wood, or painted surfaces without testing in an inconspicuous spot first.
Home Maintenance Tips to Prevent Spiders
The most effective natural spider control isn’t a repellent. It’s prevention. Three categories of home maintenance work harder than any spray.
Reduce Clutter and Hiding Spots
Spiders need stable, undisturbed surfaces to build webs or hide. Reduce that and the population drops:
- Clear storage areas in basements, attics, garages, and closets.
- Move stored items off the floor onto shelves.
- Transfer cardboard storage to plastic bins (cardboard absorbs moisture and provides ideal spider harborage).
- Regularly vacuum corners, under furniture, and along baseboards.
- Don’t let firewood, lumber, or yard debris accumulate near the foundation.
Seal Entry Points
- Caulk cracks around windows, doors, and foundation.
- Install or replace door sweeps and weatherstripping (especially garage side doors).
- Screen crawl space vents with galvanized 1/4-inch hardware cloth.
- Seal gaps around utility line penetrations with steel wool packed into the gap, then caulk over.
Control Outdoor Lighting
This is one of the most underrated spider-prevention tactics. Bright porch and exterior lights attract flying insects, which attract spiders to feed on them. Two changes that reduce indoor spider pressure significantly:
- Switch white LED bulbs to warm-toned LED (2700K to 3000K) or yellow “bug light” bulbs. They attract far fewer flying insects.
- Move outdoor lighting away from primary entry doors when possible. Mount lights on poles in the yard rather than next to the front door.
Seasonal Considerations for Spider Prevention
Spider activity in Georgia, Alabama, Tennessee, and South Carolina peaks in three windows. Plan natural repellent applications around them.
- Spring (April through May): Spider populations rebuild after winter. Apply repellents weekly during this window. Focus on outdoor entry points.
- Late summer (August): Peak indoor and outdoor population. Most spider sightings happen here. Apply repellents 2 times per week.
- Early fall (September through October): Outdoor spiders migrate toward warmer indoor spaces. Reinforce entry-point sealing and outdoor perimeter sprays.
Winter (December through February) is the low-activity window. Use it for entry-point sealing and structural prevention work.
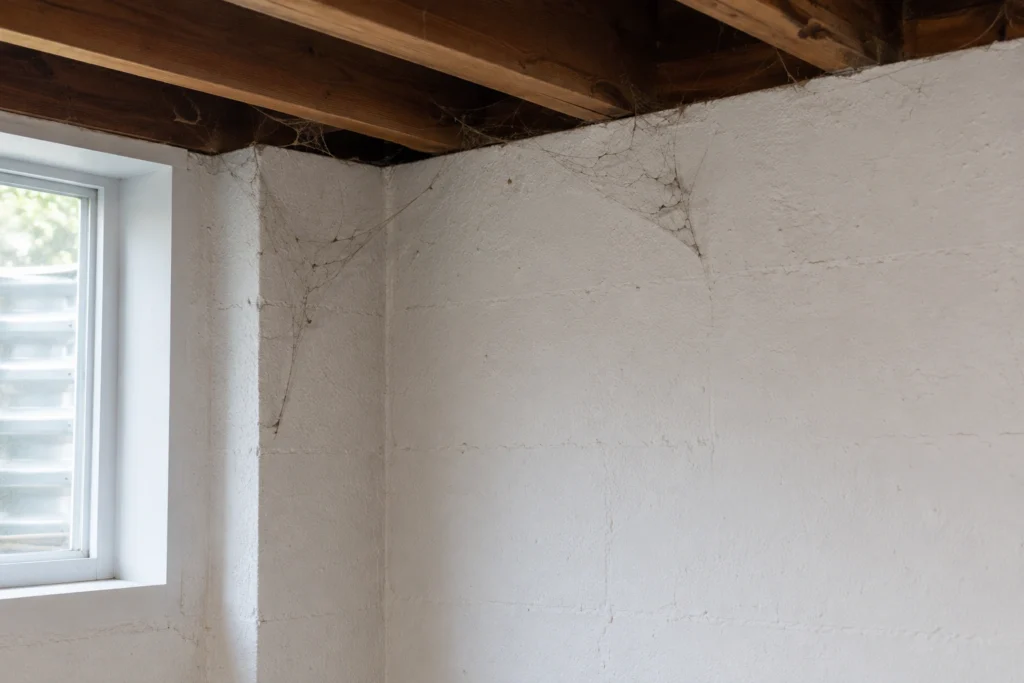
Once webs are visible in multiple corners, natural repellents alone usually aren’t enough.
When Natural Methods Aren’t Enough
Natural spider repellents handle small, occasional spider activity well. They’re not enough for:
- Large or persistent indoor populations. Multiple webs in multiple rooms, spider sightings 3+ times per week, or visible egg sacs suggest an established population that needs targeted treatment.
- Confirmed venomous species. Black widows, brown widows, or any spider you can’t identify and suspect may be medically significant. Don’t use DIY methods near these spiders. Call professionals.
- Recurring problems in living spaces. Spiders in bedrooms, kids’ rooms, or kitchens warrant a faster, more reliable approach.
- Underlying pest issues. If you’re seeing spiders along with other indoor pest activity (small flies, gnats, mosquitoes), the spiders are downstream of a larger problem that needs addressing.
Professional pest control combines exclusion (sealing entry points), targeted treatment at active harborage spots, and addressing whatever’s drawing spiders indoors. The EPA’s Integrated Pest Management (IPM) principles describe the same approach: start with the least-toxic preventive measures (which is exactly what natural repellents are), escalate to targeted treatments when prevention isn’t enough, and address the underlying conditions rather than just the visible pests.
(Tried natural methods and still seeing spiders? Request a free Northwest inspection and we’ll identify what’s around and find the entry points.)
Frequently Asked Questions About Natural Spider Repellents
Do natural spider repellents really work?
Yes, with realistic expectations. Essential oils (especially peppermint, tea tree, and citrus), cedar, and white vinegar all show measurable spider-repellent activity when applied consistently. They work best for prevention and small-scale activity. They rarely clear an established indoor population on their own.
Are essential oils safe for pets?
Some are, some aren’t. Peppermint and citrus oils are generally safe for dogs and cats in dilute sprays applied to surfaces (not directly on the pet). Tea tree and eucalyptus oils can be toxic to cats and small dogs if ingested or applied to skin. Always dilute properly, apply to surfaces (not pets), and let dry before allowing pets in the area. Consult a vet for specific concerns.
How often should I apply natural spider sprays?
Weekly is the general baseline. Apply more frequently during peak spider activity windows (April-May, August, September-October) and after any major cleaning that removes the previous application. Spray formulas typically lose effectiveness within 5 to 7 days as the essential oils evaporate.
Can I prevent spiders indoors year-round?
Yes, with consistent maintenance. Year-round prevention combines weekly natural repellent application during active seasons, ongoing clutter reduction in basements and storage areas, entry-point sealing as a one-time structural improvement, and warm-tone outdoor lighting to reduce insect attraction. Most homes can keep spider activity to occasional sightings rather than ongoing problems with this combined approach.
What’s the most effective natural spider repellent?
A peppermint and tea tree oil spray (15 drops peppermint + 10 drops tea tree per 2 cups water + 1 tsp dish soap) applied weekly to entry points and corners. Combined with cedar blocks in closets and storage areas, this combo handles most residential spider prevention without any chemicals.
When natural repellents aren’t enough, professional treatment addresses entry points and underlying conditions DIY can’t reach.
Try Natural First. Call When You Need Backup.
Natural spider repellents are a smart starting point for most Georgia and Alabama homeowners. They’re safer, cheaper, and effective for prevention. When natural methods aren’t enough (or when you’ve spotted a venomous species), Northwest’s team handles the full spider control workflow with targeted treatment, exclusion, and addressing the underlying conditions that bring spiders in.
About the Author
Anna V., Editorial Lead — Pest Education leads pest education content for Northwest Exterminating, working with senior technicians and service center managers across our Georgia, Alabama, Tennessee, and South Carolina service areas to translate field expertise into homeowner-friendly guides. The focus: accurate, regionally-specific answers to the pest questions Southeast homeowners are actually searching for.
Apr 17, 2020 | Alabama Blogs, DIY, DIY Wildlife Prevention, Georgia Blogs, Wildlife
By Anna V., Editorial Lead — Pest Education · Last updated: May 2026
If birds have taken over your roofline, started nesting in your dryer vent, or covered your back deck in droppings, you’re probably searching for a bird deterrent that actually works. At Northwest, we get bird control calls year-round across our Georgia and Alabama service area, but they spike sharply from late March through July when nesting season hits its peak. The honest version most homeowners don’t hear: most DIY bird deterrents work briefly, then stop working as birds adapt. The few that work long-term are usually the unglamorous ones (sealed vents, physical barriers, removed food sources), not the gimmicky owl decoys and ultrasonic gadgets sold on Amazon.
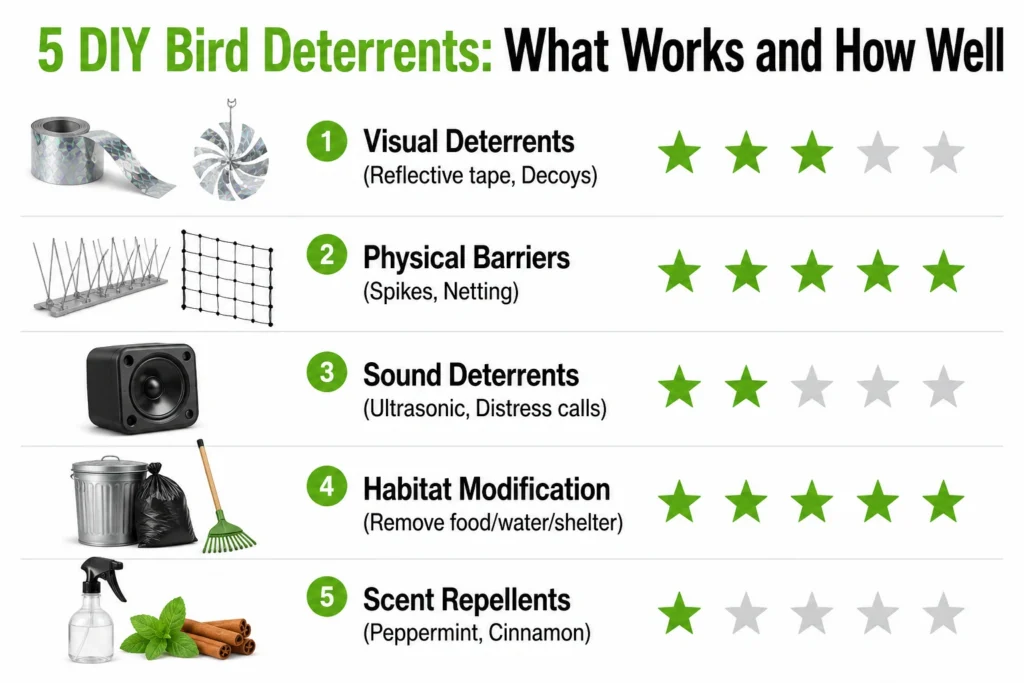
Here are the five DIY bird deterrents with the strongest track record in Southeast homes, what to expect from each, and the gimmicks worth skipping entirely.
Visual deterrents work for a while, then stop. Rotation is the difference between weeks and months of effectiveness.
Why Bird Deterrents Matter
Bird activity around a Southeast home isn’t just an annoyance. Persistent bird problems lead to:
- Droppings. Bird droppings are acidic and stain paint, siding, decking, and concrete. Cleanup is constant, and accumulated droppings can damage surfaces permanently.
- Nesting in vents and gutters. Dryer vents, bathroom vents, gable vents, and gutter corners are favorite nesting spots. Nests block airflow, create fire risk (especially in dryer vents), and trap moisture.
- Noise. Pigeons, sparrows, and starlings start their day before dawn. Nesting season runs March through August in Georgia and Alabama.
- Structural damage. Roof damage from nesting materials, clogged gutters that overflow and rot fascia boards, and acid damage to paint from droppings.
- Health and sanitation concerns. Bird droppings can carry pathogens including histoplasmosis and salmonella. Most healthy adults aren’t at significant risk, but people with respiratory issues should avoid disturbing dried droppings without proper protection.
The species causing most of the bird-control calls we run are house sparrows, European starlings, and rock pigeons. All three are non-native and not protected under federal migratory bird law, which matters when you start considering removal options (more on that below).
Do DIY Bird Deterrents Really Work?
Yes and no. Most DIY bird deterrents produce short-term results, then lose effectiveness as birds figure out they’re not actually threats. The deterrents that hold up long-term are the ones that don’t depend on birds being fooled: physical barriers and habitat changes.
Two important caveats before you start any DIY bird control:
Federal law protects most native bird species. The Migratory Bird Treaty Act of 1918 protects more than 1,000 native species, and it’s illegal to disturb their active nests, eggs, or young without specific permits. The three most common nuisance species in the Southeast (house sparrows, European starlings, rock pigeons) are non-native and not protected, but several species you may encounter (swallows, woodpeckers, robins, mockingbirds, blue jays) are protected. If you’re not sure what species you’re dealing with, pause and identify before doing anything.
Active nests with eggs or young require special handling. Even for non-protected species, the humane and recommended approach is to wait until the nest is empty before removing it. Active nest removal during breeding season is one of the situations where calling a professional is often the right move.
5 Effective DIY Bird Deterrents
Physical barriers and habitat changes do most of the heavy lifting. The other three are short-term tools.
1. Visual Deterrents (Reflective + Predator Decoys)
Reflective bird tape, hanging spinners, and predator decoys (plastic owls, hawks) all work on the same principle: scare birds with movement, light flashes, or the appearance of a predator. They work briefly, especially for new arrivals. The catch is habituation. Within two to four weeks, birds figure out the owl doesn’t move and the tape doesn’t actually threaten them.
Best practice: rotate visual deterrents weekly. Move the owl decoy to a new spot, replace reflective tape, swap the spinner for a different design. The rotation is what extends effectiveness from “a few weeks” to “all season.” Static visual deterrents left in one place stop working fast.
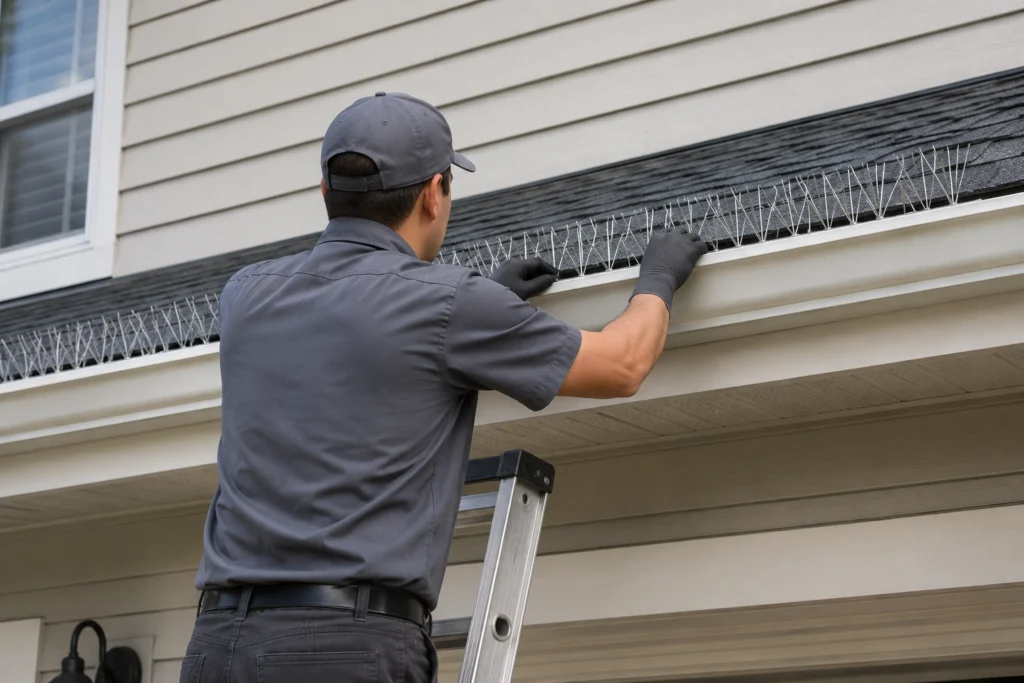
2. Physical Barriers (Spikes + Netting)
The single most effective long-term bird deterrent is making the landing spot physically unusable. Bird spikes installed along ledges, gutter edges, and rooflines prevent landing entirely. Bird netting stretched across eaves, soffit openings, or under solar panels blocks nesting access without harming birds.
Where physical barriers shine in Southeast homes:
- Gutter edges (favorite pigeon and starling landing spots)
- Eave overhangs (common sparrow nesting locations)
- Solar panel undersides (a big issue in newer Georgia construction)
- HVAC equipment housings and mini-split heads
- Window AC unit tops
- Gable vents and attic vents (with proper mesh, not just bird netting)
Bird spikes and netting installed correctly can last 10+ years and require near-zero maintenance. The catch: installation matters. Poor installation creates gaps birds exploit, and once a bird gets through, the whole barrier loses credibility.
3. Sound Deterrents (Ultrasonic + Distress Calls)
Ultrasonic devices and recorded distress calls (audible to birds, played on speakers) can disrupt new arrivals and slow nesting attempts. The research on ultrasonic devices specifically is mixed. Most independent testing shows limited effectiveness for birds, despite aggressive marketing claims. Audible distress calls work better but have an obvious downside in residential settings: they’re loud, and your neighbors will notice.
Sound deterrents are most useful in open commercial settings (parking lots, warehouse rooflines, agricultural buildings). They’re rarely the right choice for a single-family home in a Georgia or Alabama neighborhood.
4. Habitat Modification (the Most Overlooked Method)
The most underrated bird deterrent strategy isn’t a product. It’s removing the things drawing birds to your property in the first place. Birds keep showing up because the conditions are good. Change the conditions and most of them move on.
- Eliminate food sources. Bird feeders that overflow, pet food bowls left outside, accessible trash, fallen fruit under pecan or fig trees, breadcrumbs after outdoor meals. Any of these will pull birds in and keep them returning.
- Cut off water access. Standing water in birdbaths, clogged gutters that pool water, irrigation puddles, and uncovered pools all draw birds. Mosquitoes too, which then draws other pests.
- Trim trees and shrubs back from the house. A three-foot clear zone around the foundation and roofline reduces nesting opportunities and travel routes onto the house.
- Clean gutters regularly. A clogged gutter with debris is a five-star nesting site for sparrows and starlings.
- Seal entry points. Gaps in soffits, broken or missing vent covers, open chimneys without caps. The same exclusion work that keeps rodents out keeps birds out too.
Habitat modification is the only DIY method that addresses why birds came in the first place rather than just shooing them away. It’s also the only one that compounds: each year you maintain it, the cumulative effect grows.
5. Scent Repellents (Honest Effectiveness)
Peppermint oil, cinnamon, methyl anthranilate (the active compound in commercial bird repellents like grape extract sprays), and other scent-based products show modest, short-term effects in field testing. The catch: outdoor scents fade within days, wash out with rain, and require constant reapplication. They’re not a standalone solution.
Where scent repellents can earn their place: as a supplement to physical barriers in spots where you can’t install spikes or netting. Otherwise, treat them as the lowest-tier option.
The yards we treat for repeat bird problems almost always have an exposed food source, a water source, or open nesting cavities.
What Doesn’t Work (Bird Deterrent Myths to Skip)
A few “classic” bird deterrent ideas circulate widely but don’t hold up.
- Fake owls left in one place. Birds figure them out in days. Without rotation, they’re inert.
- Random DIY sprays. Vinegar, dish soap, garlic water, cayenne pepper, and similar mixes don’t have research support for bird control. They wash out fast and damage plants in the meantime.
- Wind chimes alone. Birds adapt to consistent sounds within a week. Wind chimes are pleasant. They’re not deterrents.
- Single-method approaches. Any one DIY deterrent works briefly. Combining two or three (e.g., physical barriers + habitat modification + rotating visual deterrents) is where homeowners see lasting results.
Humane Bird Exclusion: The Long-Term Approach
The most effective bird control isn’t a product. It’s exclusion, which means making your property physically unable to host birds in the spots they want to nest. Exclusion combines:
- Sealing every gap in vents, soffits, and rooflines with appropriate mesh or hardware cloth
- Installing bird spikes on landing surfaces
- Adding bird netting under solar panels and over open eaves
- Capping chimneys with bird-proof caps
- Modifying the surrounding habitat to remove food, water, and shelter
Exclusion done right typically lasts 10 years or more with minimal maintenance. It’s also the only approach that fully complies with the Migratory Bird Treaty Act, because it prevents nesting before it starts rather than removing active nests later.
When to Call a Professional for Bird Control
DIY bird deterrents handle small, early-stage bird problems well. Call Northwest for bird control if:
- Birds keep returning to the same spot despite your DIY efforts.
- Nests are in hard-to-reach or hazardous areas (high roofs, gable vents, solar panels).
- You’re dealing with large flocks (more than 10 birds at a time) or commercial properties.
- You suspect protected species are involved.
- An active nest needs removal mid-season.
- You want long-term exclusion done correctly the first time.
(Birds keep returning after you’ve tried DIY? Request a free Northwest bird control inspection and we’ll identify the species, find the entry points, and lay out a long-term exclusion plan.)
Bird Control in the Southeast
Birds in Georgia, Alabama, Tennessee, and South Carolina behave a little differently than in cooler parts of the country. Three regional factors increase bird pressure on Southeast homes:
- Longer nesting season. Warm spring weather arrives early and lingers into fall. House sparrows can produce three to four broods per year here, compared to two in colder regions.
- Year-round resident populations. Rock pigeons and house sparrows don’t migrate. They’re a problem every month of the year, not just in summer.
- Construction patterns. Open soffits, gable vents, and unscreened crawl space vents are common in older Atlanta, Birmingham, Savannah, and Macon homes. Each is a bird entry point.
The good news: the same exclusion approach that solves bird problems also solves rodent problems and helps with snake prevention. For more on how those pest categories connect, see our snake repellent guide on the rodent-snake-bird sealing connection. For the broader question of getting rid of birds already established on your home, see our companion guide on how to get rid of birds around your home.
Frequently Asked Questions About Bird Deterrents
What bird deterrent works best?
Physical barriers (bird spikes and netting) are the most effective long-term solution because they don’t depend on birds being fooled. Combined with habitat modification (removing food, water, and shelter), they handle most residential bird problems for years with minimal maintenance.
Are bird deterrents harmful to birds?
Most modern bird deterrents are designed to be humane and non-lethal. Bird spikes, netting, sound, scent, and visual deterrents discourage birds without injuring them. Avoid sticky gels or glue traps marketed for birds. They can trap and injure or kill birds and are illegal to use against protected species.
Do birds come back after deterrents are installed?
They can, especially if deterrents aren’t maintained or rotated. Static deterrents (a single fake owl, reflective tape that never moves) lose effectiveness within weeks. Combining multiple methods and rotating visual deterrents weekly extends results dramatically.
Are birds protected by law?
Yes, most native bird species are protected under the federal Migratory Bird Treaty Act, which makes it illegal to disturb their nests, eggs, or young without specific permits. The three most common nuisance species in the Southeast (house sparrows, European starlings, rock pigeons) are non-native and not protected. If you’re unsure what species you’re dealing with, identify the bird before removing nests.
How long does it take to get rid of birds with DIY deterrents?
If you start at the early-arrival stage (a few birds scouting, no active nests), DIY deterrents can resolve the issue in one to two weeks. If birds have already established nests, expect a longer timeline (often a full nesting season) before you can fully exclude them. Active nests of protected species cannot be removed mid-season; you’ll need to wait for the young to fledge before sealing the area.
Professional exclusion lasts years. DIY deterrents that get rotated and maintained can match it for smaller problems.
Ready to Stop the Bird Problem at the Source?
If you’ve tried a DIY bird deterrent or two and the birds keep coming back, the problem isn’t the deterrent. It’s the conditions around your home that keep drawing birds in. Northwest’s wildlife team handles the full bird-control workflow: species identification, exclusion installation, habitat assessment, and follow-up to make sure birds don’t find a new spot to set up shop.
About the Author
Anna V., Editorial Lead — Pest Education leads pest education content for Northwest Exterminating, working with senior technicians and service center managers across our Georgia, Alabama, Tennessee, and South Carolina service areas to translate field expertise into homeowner-friendly guides. The focus: accurate, regionally-specific answers to the pest questions Southeast homeowners are actually searching for.
Mar 20, 2020 | Alabama Blogs, Georgia Blogs, Pest Control, Wildlife
By Anna V., Editorial Lead — Pest Education · Last updated: May 2026
When a homeowner in Georgia or Alabama calls Northwest about a rodent problem, our first question is almost always: mouse or rat? The two get lumped together in everyday conversation, but they behave differently, leave behind very different evidence, and require different treatment approaches. Misidentifying which species you have is one of the most common reasons DIY rodent control fails. A trap baited and placed for a mouse will sit untouched while a rat sniffs it and moves on. A rat-sized opening sealed against mice still lets the much smaller mice walk right in.
Here’s how to tell a mouse from a rat at a glance, what each one’s droppings, gnaw marks, and behavior look like in a Southeast home, and when the difference between them changes how you treat the problem.
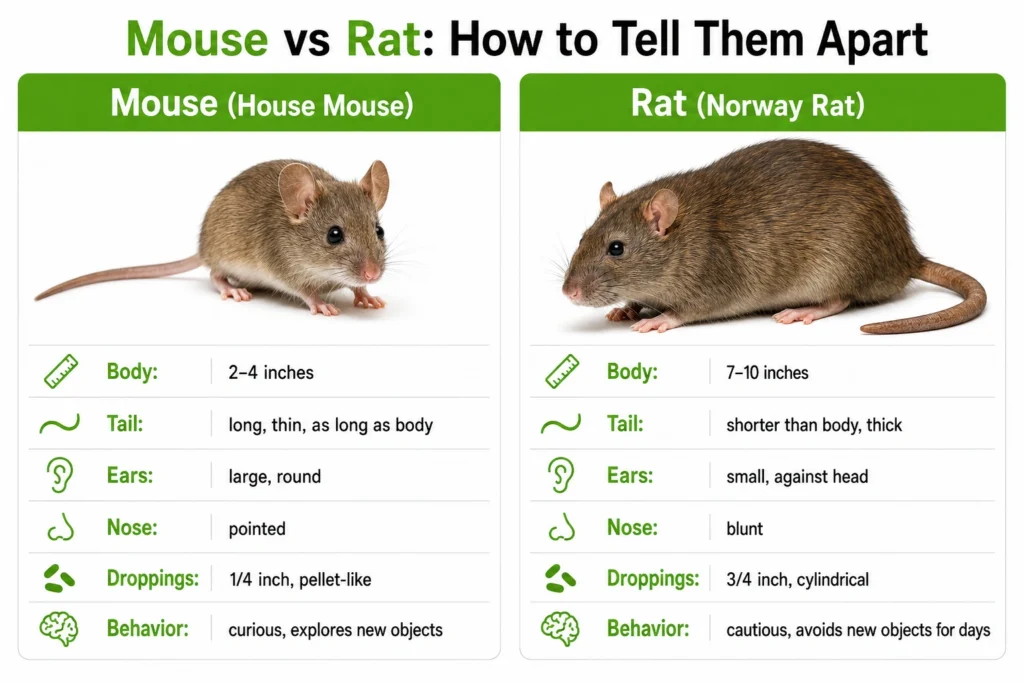
Size is the fastest clue. A mouse fits in a tablespoon. A rat doesn’t.
What’s the Difference Between a Mouse and a Rat?
The physical differences between a mouse and a rat are obvious once you’ve seen them side by side. The challenge is that most homeowners only see one of them, briefly, in low light, before it disappears behind the refrigerator. Here’s what to look for if you only get a glimpse.
Mice (house mouse, deer mouse) are small. Adult body length is typically 2 to 4 inches, not counting the tail, which is about as long as the body. They have slender bodies, pointed noses, and large round ears that look oversized for their head. Their fur is usually light brown or gray. They’re curious by nature and tend to explore new objects in their territory within hours.
Rats (Norway rat, roof rat) are substantially larger. Adult body length runs 7 to 10 inches, with a tail that’s shorter than the body. They have thicker, heavier bodies, blunt noses, and proportionally smaller ears tucked against the head. Norway rats (the most common in Georgia and Alabama) are brown or gray with shaggier fur. Roof rats are darker, sleeker, and more agile climbers. Both are cautious by nature and will avoid new objects in their territory for days before approaching — a behavior pest pros call “neophobia.”
That neophobia is the single biggest reason rat traps fail when homeowners set them. Mice walk into traps within hours. Rats will avoid them for a week.
Mouse vs Rat Identification Guide
Size, tail, and droppings are the three identifiers most homeowners can use without seeing the rodent itself.
Quick Comparison Table
| Feature |
Mouse |
Rat |
| Body length |
2 to 4 inches |
7 to 10 inches |
| Tail |
Long and thin, about as long as body |
Shorter than body, thick and scaly |
| Ears |
Large and rounded, look oversized |
Small, held closer to the head |
| Nose |
Pointed, narrow |
Blunt, broader |
| Droppings |
1/8 to 1/4 inch, pellet-like |
1/2 to 3/4 inch, cylindrical |
| Behavior |
Curious, investigates new objects |
Cautious, avoids new objects for days |
| Where they nest |
Indoors, in walls, cabinets, attics |
Outdoors in burrows; indoors in basements, crawl spaces |
| Reproduction |
5 to 10 litters per year, faster cycle |
2 to 5 litters per year, larger litters |
Common Species in the Southeast
In Georgia, Alabama, Tennessee, and South Carolina, the rodents you’re most likely to encounter inside a home are:
- House mouse (Mus musculus) — the most common indoor rodent across the entire Southeast.
- Deer mouse (Peromyscus maniculatus) — more common in rural and wooded areas. Notable because it’s a primary carrier of hantavirus.
- Norway rat (Rattus norvegicus) — also called the brown rat or sewer rat. Common in older urban neighborhoods of Atlanta, Birmingham, Savannah, and Macon.
- Roof rat (Rattus rattus) — also called the black rat. More common along the coast and in warmer parts of the service area. Strong climber, often found in attics.
Signs You Have a Mouse or a Rat
If you haven’t actually seen the rodent yet, the signs they leave behind will tell you which species you’re dealing with. Here’s what to look for and how to read it.
Droppings (the most reliable indicator)
Mouse droppings are tiny, dark, and shaped like grains of rice with pointed ends. They’re typically 1/8 to 1/4 inch long. A single mouse can leave 50 to 75 droppings a day, so you’ll find them scattered widely — along baseboards, inside cabinets, in pantry corners, on the back of countertops.
Rat droppings are much larger, 1/2 to 3/4 inch long, dark, and shaped like a thick capsule with blunt or pointed ends (depending on species). You’ll find them in concentrated piles near nesting sites or along regular travel paths — usually in basements, crawl spaces, near food storage, or along walls.
Size alone is the easiest tell. If the droppings are smaller than a grain of rice, you have mice. If they’re larger than a coffee bean, you have rats.
Gnaw Marks
Mice leave small, scratchy bite marks on food packaging, the corners of cardboard boxes, and the edges of wooden trim. The marks are usually clean and close together, made by their tiny incisors.
Rats chew through harder materials and leave much larger, rougher marks. Rats can chew through soft wood, insulation, drywall, lead pipes, aluminum siding, and most plastic. Damaged electrical wiring, holes the size of a quarter or larger in baseboards or insulation, and torn-open food storage containers all suggest rats rather than mice.
Mouse damage looks like fine scratches. Rat damage looks like something chewed a hole.
Nesting Material
Mice build small, well-organized nests using shredded paper, fabric, insulation, and dryer lint. Nests are typically hidden in wall voids, behind appliances, inside cabinets, in attic insulation, or in stored boxes. Each nest is the size of a softball or smaller.
Rats build larger, messier nests using similar materials but on a different scale. Norway rat nests are often outdoors in burrows under decks, sheds, or vegetation. Roof rat nests are usually in attics or upper wall voids. Both species’ indoor nests are noticeably larger than a mouse’s, ranging from softball-sized to football-sized.
Sounds and Smells
Mice make light scurrying and scratching sounds, often heard at night in walls or above ceilings. Rats make heavier, slower, more obvious sounds, sometimes including thumps as they jump between surfaces. Both species produce a musky urine smell when populations grow, with rats producing a much stronger odor due to their larger body size and concentrated activity.
Damage Caused by Mice vs Rats
The damage pattern in your home is a strong species indicator and an important factor in how urgent treatment is.
Mice cause modest structural damage in most situations. They chew through food packaging, gnaw on baseboards and wooden trim, and damage stored items. The biggest mouse risk is food contamination and the secondary pest problem of indoor flea or mite populations that can travel with them.
Rats cause significant structural damage when populations establish. They chew through electrical wiring (creating real fire risk), tear through insulation, gnaw on plumbing, and damage HVAC ductwork. The repair costs for rat damage routinely run into thousands of dollars. Rats also pose more serious disease transmission risk than mice.
Health Risks: Mouse vs Rat
Both species carry diseases, but rats present a broader and more severe health risk profile. The CDC’s rodent disease guidance documents both species as vectors for pathogens.
Diseases associated with mice include hantavirus (especially from deer mice), salmonella contamination of food surfaces, and allergens that trigger asthma in sensitive individuals.
Diseases associated with rats include leptospirosis (transmitted through contact with rat urine), rat-bite fever, salmonella, and historically the bubonic plague (still present at low levels in some U.S. populations). Rats also carry fleas that can transmit additional pathogens.
The practical takeaway: any rodent presence indoors warrants attention, but a confirmed rat sighting is more urgent than a mouse sighting from a health-risk standpoint.
Behavior & Habitat Differences in Southeast Homes
Where each species nests in a Georgia or Alabama home tells you a lot about how they got in and how to address them.
Mice nest indoors year-round. They prefer wall voids, attic insulation, behind appliances, inside stored boxes, and in cluttered storage spaces. A mouse only needs a hole the diameter of a dime to get inside, which means tiny gaps around utility line penetrations, foundation cracks, and worn weatherstripping are all entry points.
Rats typically nest outdoors and travel indoors for food. Norway rats burrow in yards, under decks and sheds, and along foundations. Roof rats nest in attics, palm trees (in coastal areas), and shed rafters. A rat needs a hole the diameter of a quarter to get inside. Larger entry points, garage door gaps, and unsealed crawl space access doors are the typical routes.
Seasonal pattern in the Southeast: rodent indoor activity peaks from late October through March, as outdoor food sources dwindle and rodents seek warmth and shelter. Mice are active year-round indoors; rats become more visible in cooler months.
Mouse vs Rat Control & Prevention
Once you know which species you’re dealing with, the treatment approach changes meaningfully.
DIY Prevention (works for both)
- Seal all entry points larger than 1/4 inch with steel wool and caulk (mice can’t gnaw through steel wool).
- Store food in airtight containers (glass or hard plastic, not bags).
- Take out trash daily, especially in warm months.
- Eliminate clutter in basements, attics, and garages.
- Fix any water leaks; rodents need water too.
- Trim vegetation back from the foundation and roofline.
Treatment That Actually Works
For mice, snap traps baited with peanut butter and placed perpendicular to walls catch most populations within a few days. Mice walk into them readily because of their curiosity.
For rats, the approach is slower and more deliberate. Set traps but don’t bait them for the first 5 to 7 days. Let rats get used to the new object in their environment first, then bait. Place traps along walls where droppings show heavy activity. This works around their neophobia.
For both species, bait stations with rodenticide can be effective but introduce risks: dead rodents in wall voids cause severe odor problems, secondary poisoning of pets and wildlife is a real concern, and rats often die in inaccessible spots. We generally recommend trapping over baiting for residential rodent control.
When to Call a Professional
Call Northwest for professional rodent control if:
- You’ve identified rats specifically (not just mice). Rats benefit from professional trapping experience.
- Sightings have continued for more than two weeks despite DIY traps.
- You’ve found droppings in multiple rooms or on multiple floors, suggesting an established population.
- You’re seeing rodents during the day, which often indicates a large hidden population.
- You want a full entry-point seal-up, not just trapping.
(Not sure if you have mice or rats? Request a free Northwest inspection and we’ll identify the species, locate entry points, and lay out the right treatment plan.)
One Last Thing: Rodents Drive Other Pest Problems
A mouse or rat problem rarely stays a mouse or rat problem for long. Rodents bring fleas and mites indoors, draw snakes that hunt them (a major reason snake sightings spike when rodent populations are high; see our snake repellent guide for more), and create the kind of warm, food-rich environments other pests follow. Rodent control is often the first step in solving secondary pest problems too.
For more on what happens when you have both species at once, see our companion guide on whether rats and mice can infest your home at the same time.
Frequently Asked Questions About Mouse vs Rat Identification
How can I tell if I have a mouse or a rat?
The fastest tell is droppings size. Mouse droppings are tiny (1/8 to 1/4 inch) and rice-shaped. Rat droppings are much larger (1/2 to 3/4 inch) and capsule-shaped. Gnaw marks are also a strong indicator: small scratchy marks suggest mice, while larger chewed holes suggest rats.
Are rats more dangerous than mice?
Generally yes. Rats cause more structural damage (chewed wiring, plumbing, insulation), carry a broader range of diseases, and produce stronger health-risk concerns through their droppings, urine, and the fleas they often carry. Both species warrant treatment, but rat problems should be addressed faster.
Do mice or rats spread disease?
Both spread disease, but rats are vectors for more pathogens. Mice can transmit hantavirus (especially deer mice), salmonella, and allergens that trigger asthma. Rats can transmit leptospirosis, rat-bite fever, salmonella, and several pathogens carried by the fleas that often travel with them.
What time of year are rodents most active in the Southeast?
Indoor rodent activity in Georgia, Alabama, Tennessee, and South Carolina peaks from late October through March as outdoor food sources dwindle and rodents seek warmth indoors. Mice are active year-round indoors. Rats become noticeably more visible in cooler months.
Can mice and rats live in the same house at the same time?
Yes, but they typically don’t share the same nesting space. Rats generally exclude mice from areas where rat populations are dense. In homes large enough or with enough resources, you can find both species in different parts of the structure. For a deeper look at co-infestation, see our companion guide on rats and mice infesting the same home.
Identifying the species is the first step. Sealing the entry points is what keeps them out long term.
Schedule a Rodent Inspection
If you’ve found droppings, heard scratching in the walls, or actually seen something dart across the floor, the smart move is to identify the species and seal the entry points before the population grows. Northwest’s team has been clearing rodent problems out of Georgia, Alabama, Tennessee, and South Carolina homes for decades, and most of what we do for rodent calls is finding the entry points homeowners missed and treating the species that’s actually present.
About the Author
Anna V., Editorial Lead — Pest Education leads pest education content for Northwest Exterminating, working with senior technicians and service center managers across our Georgia, Alabama, Tennessee, and South Carolina service areas to translate field expertise into homeowner-friendly guides. The focus: accurate, regionally-specific answers to the pest questions Southeast homeowners are actually searching for.
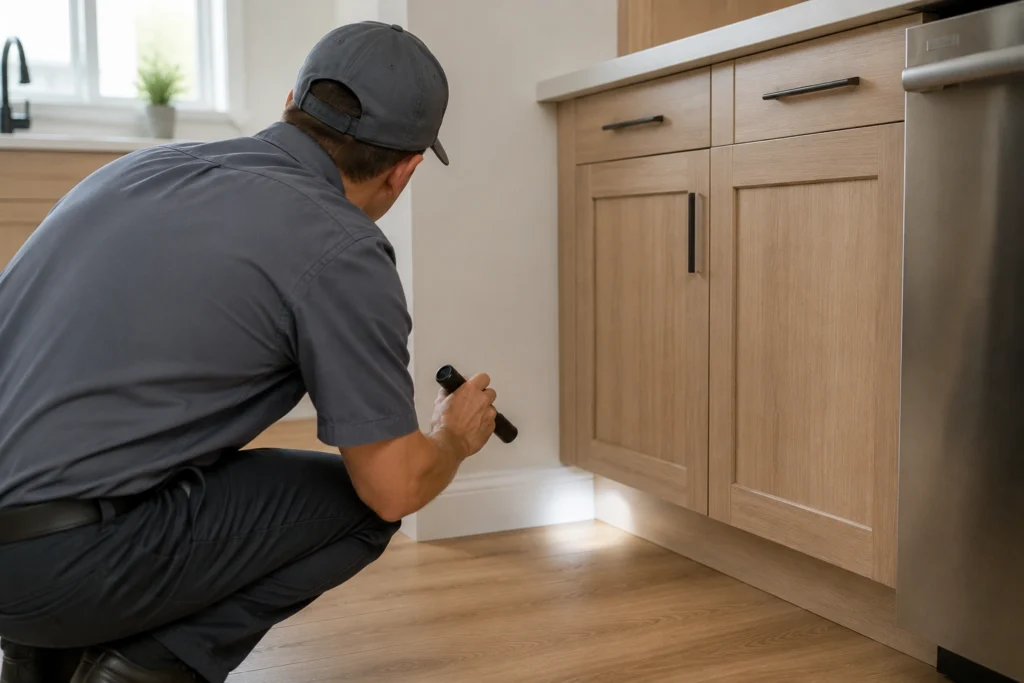
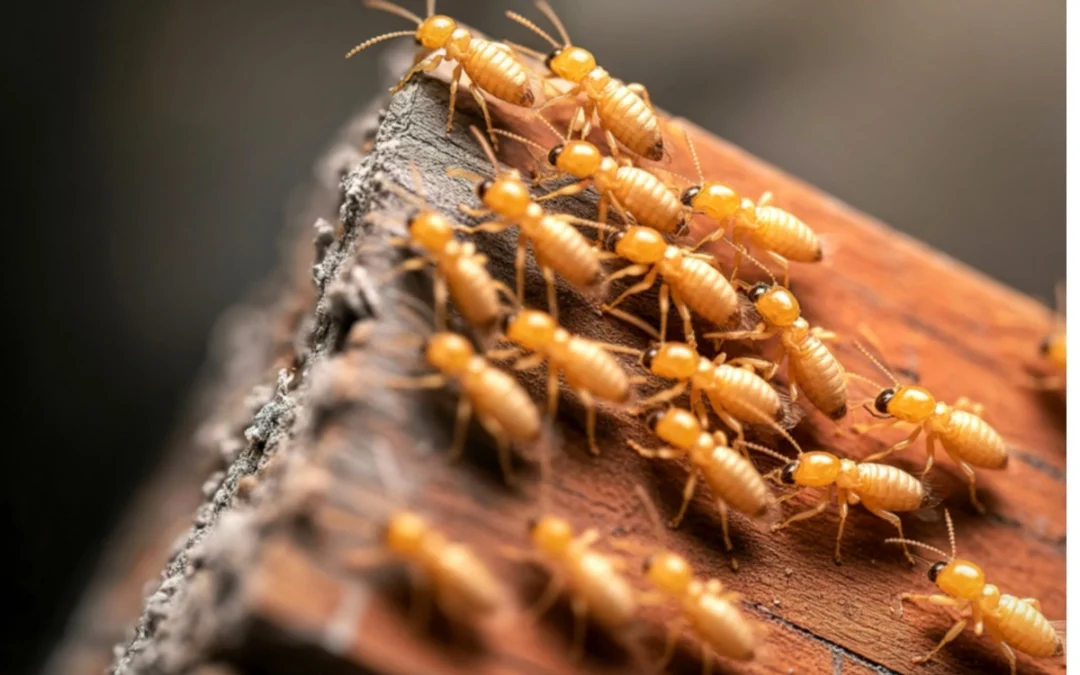
Dec 20, 2019 | Alabama Blogs, Georgia Blogs, Termite Control
By Anna V., Editorial Lead — Pest Education · Last updated: May 2026
Termites cause an estimated $5 billion in property damage across the U.S. every year, and the Southeast accounts for a disproportionate share because of our warm, humid climate. At Northwest, we inspect for termites year-round across Georgia, Alabama, Tennessee, and South Carolina, and the pattern we see over and over is the same: homeowners assume they’re either lucky or unlucky when it comes to termites. They’re neither. Termite damage is largely preventable, and the homes that get hit hardest almost always have one or more risk factors that could have been addressed years earlier.
Here’s the full termite prevention playbook for Southeast homes, including the conditions that attract termites, the DIY steps that actually move the needle, when professional treatment is worth it, and how often you should be inspecting.
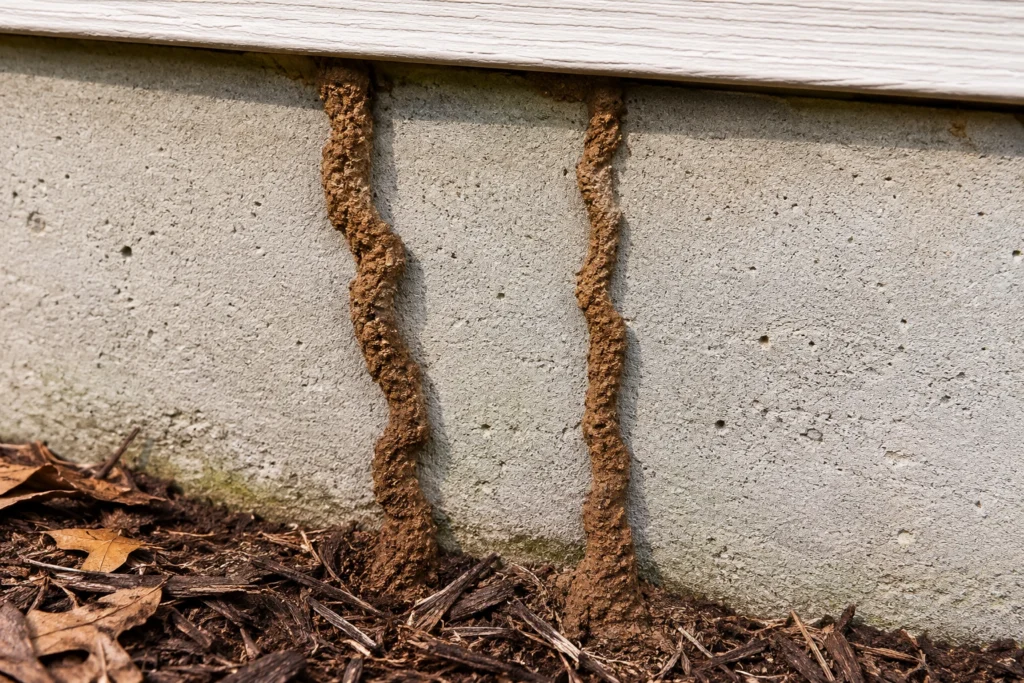
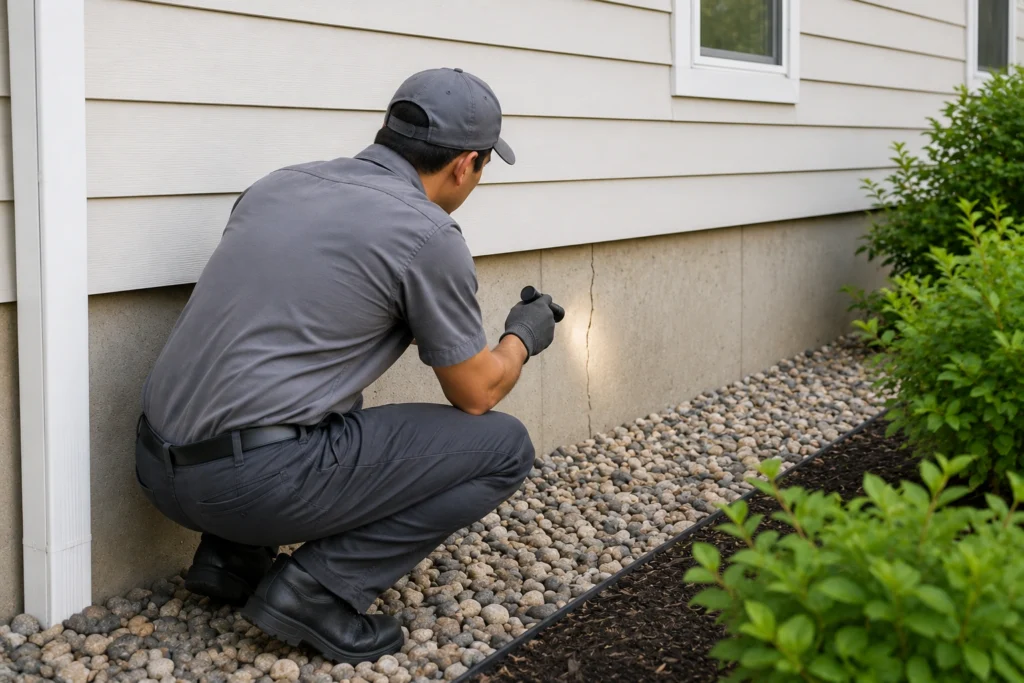
Mud tubes on a foundation wall are the most reliable early warning sign of subterranean termite activity.
Why Termite Prevention Is Essential in the Southeast
Three facts make termite prevention non-optional for Southeast homeowners:
- Eastern subterranean termites are present in every county of Georgia and Alabama. They’re not a “what if,” they’re a “when.” The question for most homes isn’t whether termites are nearby, it’s whether your house has the conditions that let them in.
- Damage is usually invisible until it’s significant. Termites work inside wood from the interior outward. By the time you can see visible damage on a wall, sub-floor, or window frame, you’re typically looking at thousands of dollars in repair on top of treatment.
- Most homeowner insurance does not cover termite damage. Repair costs come out of your pocket. Average treatment + repair for a moderate infestation in the Southeast runs $3,000 to $8,000.
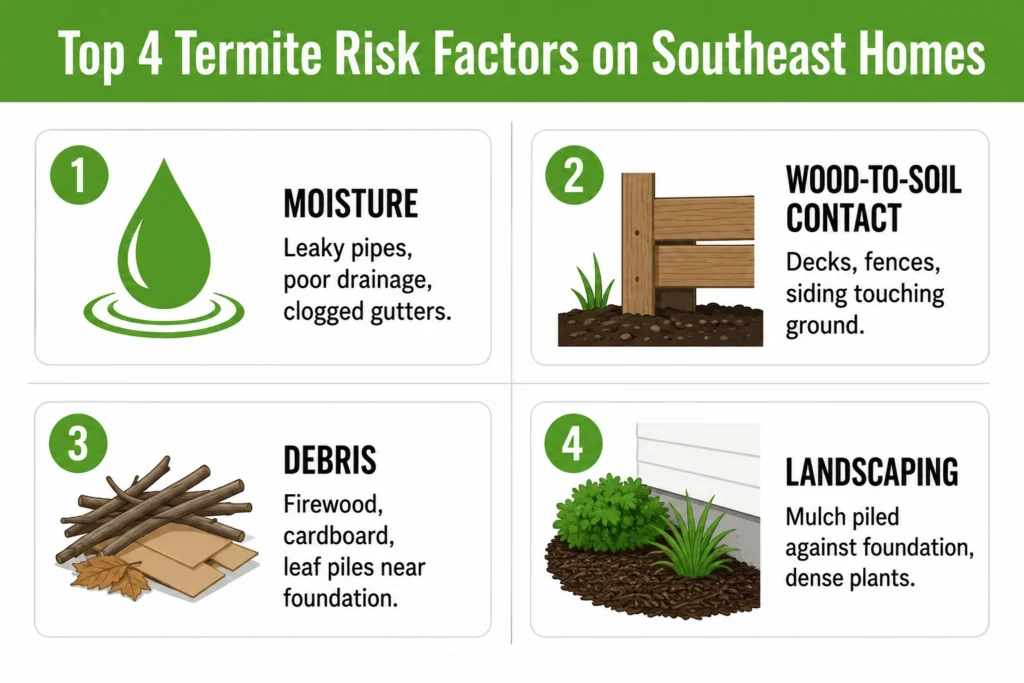
Common entry points: wood-to-soil contact around the foundation, cracks in slab foundations or concrete blocks, expansion joints, leaky pipes or excessive moisture, mulch or firewood piled against exterior walls, and gaps where utility lines penetrate the foundation.
Identifying Termite Risk Factors on Your Property
Four risk factors account for most Southeast termite calls. Fix these and you remove the conditions termites need.
Four conditions account for the majority of termite activity in Southeast homes. If you have one or more of these, you’re at elevated risk regardless of what neighbors are seeing.
1. Moisture and Water Issues
Subterranean termites need consistent moisture to survive. Anything that creates a damp microclimate near or under your home raises the risk:
- Leaky exterior faucets, hose bibs, or irrigation lines
- Clogged or missing gutters that dump water at the foundation
- Landscaping graded toward the house rather than away from it
- Air conditioner condensate lines that discharge near the foundation
- Plumbing leaks under sinks, in crawl spaces, or in slab penetrations
2. Wood-to-Soil Contact
Wherever wood touches soil directly, you’ve given termites a no-effort entry path:
- Wooden deck posts set directly in the ground without concrete footers
- Wooden fence posts touching the house
- Wood siding that extends below grade level
- Trellises or arbors attached to the house with the base in soil or mulch
- Wooden steps or porch supports without termite shields
3. Clutter and Yard Debris
Debris near the foundation provides food, shelter, and a launching point for termite colonies:
- Firewood stacked against the house or within 20 feet of the foundation
- Cardboard boxes, lumber, or pallets stored next to the house
- Leaf piles and yard waste against exterior walls
- Old tree stumps within 20 feet of the foundation (subterranean termites love decaying stumps)
4. Landscaping Decisions
Mulch is great for gardens but problematic near foundations:
- Maintain a 2- to 3-foot gap between mulch and the foundation
- Use pea gravel or river rock in the 2-foot zone immediately adjacent to the foundation
- Trim shrubs back from exterior walls (dense vegetation traps moisture and hides mud tubes)
- Avoid heavy irrigation right at the foundation
DIY Termite Prevention Tips
Most prevention work is structural and seasonal. Done right, these steps significantly lower your risk without specialized equipment.
Regular Inspections
Walk your property twice a year (spring and fall) and look for:
- Mud tubes (pencil-thick brown tunnels) running up foundation walls or in crawl spaces
- Wood that sounds hollow when tapped or has blistering paint
- Small piles of what looks like sawdust or fine pellets near wood structures (frass from drywood termites or carpenter ants)
- Discarded wings near windows or doors after a warm rainy day (termite swarmer evidence)
- Sagging or warped flooring that wasn’t there before
Moisture Control
- Clean gutters twice a year and install gutter guards if you have heavy tree cover
- Add downspout extensions to direct water 4+ feet from the foundation
- Run a dehumidifier in basements and conditioned crawl spaces (target 50% RH or below)
- Fix any plumbing leak within 48 hours
- Re-grade landscaping if water pools near the foundation after rain
Remove Wood and Debris Near the Home
- Move firewood to a rack at least 20 feet from the house and elevated off the ground
- Remove old tree stumps within 20 feet of the foundation
- Store lumber, cardboard, and yard tools off the ground in a shed or garage
- Rake fallen leaves away from foundation walls
Natural Deterrents (Supplementary Only)
These don’t replace professional treatment for active infestations but can complement prevention:
- Orange oil or neem oil treatments on exposed exterior wood
- Diatomaceous earth along the foundation perimeter (works on a range of pests including some termites)
- Borate-based wood preservatives on accessible structural wood (decks, fences)
Professional Termite Prevention Methods
For Southeast homes, professional termite prevention is the highest-ROI structural investment most homeowners make. It’s also the only thing that meaningfully protects against a heavy subterranean termite year.
Chemical Barrier (Liquid Termiticide) Treatments
Pest control technicians trench around the foundation and apply a long-lasting termiticide (typically fipronil or imidacloprid) into the soil. This creates a continuous chemical barrier that subterranean termites can’t cross to reach the structure. Modern non-repellent termiticides are particularly effective because the termites don’t detect them and carry the active ingredient back to the colony, often eliminating it. Typical protection lasts 5 to 10 years.
Termite Bait Systems
In-ground bait stations placed around the foundation contain cellulose attractive to subterranean termites. Foraging termites find the bait, share it with the colony through grooming and food exchange, and the active ingredient (typically hexaflumuron or chlorfluazuron) disrupts molting and eliminates the colony. Sentricon and similar systems require ongoing monitoring (typically quarterly or annually) and offer long-term colony elimination rather than just a barrier.
Inspection and Monitoring Services
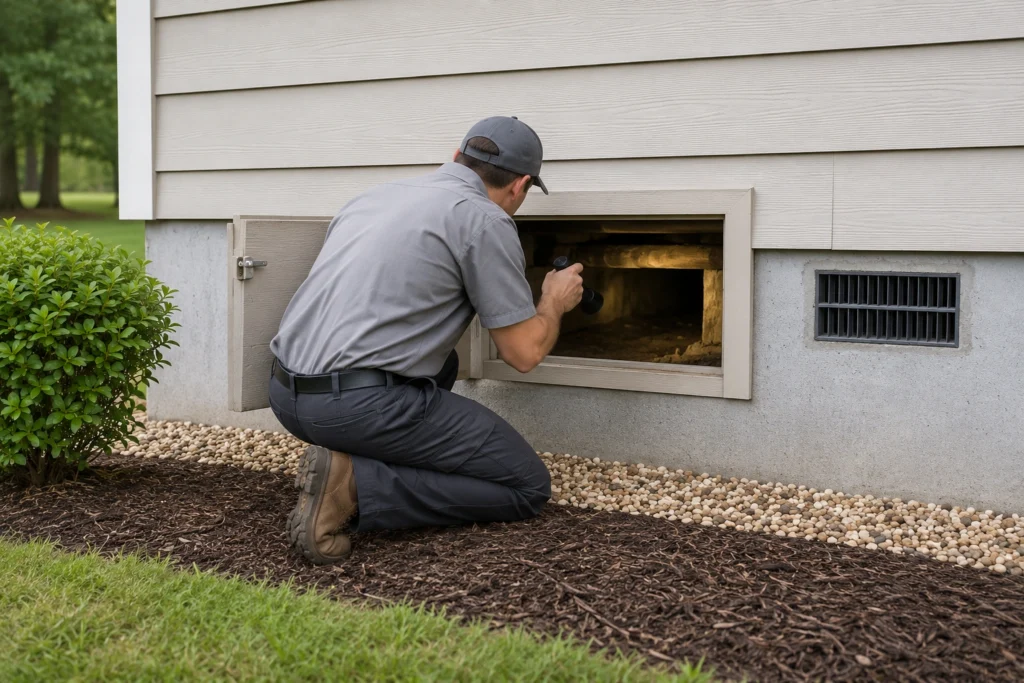
Professional inspections detect early signs homeowners miss: subterranean mud tubes in inaccessible crawl spaces, drywood damage inside wall voids, moisture issues that create termite-favorable microclimates. Annual inspections are the minimum recommendation for Southeast homes. Twice yearly is more appropriate for homes with risk factors or in heavily wooded areas.
When to Call a Professional Immediately
- Mud tubes on the foundation, in crawl spaces, or inside the home
- Discarded swarmer wings near windows or doors
- Hollow-sounding or visibly damaged wood
- Frass (fine wood-colored pellets) near wood structures
- Sagging floors or doors that suddenly don’t close properly
- You’re buying a home in the Southeast (a pre-purchase termite inspection is essentially required by every reputable lender)
Carpenter Ants vs Termites: Don’t Confuse Them
Carpenter ants and termites both damage wood, but they’re different pests with different treatments. Homeowners often confuse the two:
- Termites eat wood for nutrition. Damage looks smooth and follows the wood grain. Bodies are pale/cream-colored with straight antennae and equal-length wings (in swarmers). They build mud tubes.
- Carpenter ants excavate wood for nesting (they don’t eat it). Damage looks like clean tunnels with sawdust-like frass nearby. Bodies are dark, segmented, with bent antennae and wings of unequal length. No mud tubes.
Both warrant professional treatment, but the methods differ. If you’re unsure which you’re dealing with, see our ants in the kitchen guide for carpenter ant identification details.
Seasonal and Regional Considerations
A foundation with proper drainage, mulch clearance, and no wood-to-soil contact is the structural baseline for termite prevention.
Termite activity follows distinct seasonal patterns in the Southeast:
- Late winter through spring (February-May): Peak swarming season. Subterranean termite swarmers emerge after warm rains, mate, and start new colonies. Most homeowner discoveries happen during this window.
- Summer (June-August): Colonies are at maximum foraging activity. Damage progresses fastest during these months.
- Fall (September-November): Reduced swarming but continued foraging. Good time for prevention work because next year’s swarmers haven’t emerged yet.
- Winter (December-February): Slowed but not dormant in the deep South. Indoor heated environments can keep populations active year-round.
Schedule professional inspections in late winter (January-February) so you catch any new activity before peak swarming season.
Termite Prevention Cost vs Damage Cost
A perspective on the math:
- Annual termite inspection: $75 to $200
- Initial liquid termiticide treatment (typical Southeast home): $1,200 to $2,500
- Bait system installation: $1,500 to $3,000, plus $300 to $600 annual monitoring
- Average damage repair from moderate infestation: $3,000 to $8,000
- Severe damage repair (structural beams, sub-floors): $10,000 to $25,000+
Prevention almost always costs less than treatment + repair, often by a factor of 5 to 10x. For a deeper authoritative reference, UGA Extension’s subterranean termite management guide covers the biology and treatment options in technical detail.
(Worried about termites or due for an inspection? Schedule a free Northwest inspection and we’ll assess your risk factors and recommend the right protection level.)
Frequently Asked Questions About Termite Prevention
Can termites be prevented entirely?
No method is 100% foolproof, but the combination of structural prevention (sealing entry points, controlling moisture, maintaining wood-to-soil separation), professional barrier or bait treatment, and regular inspections reduces risk by an enormous margin. Properly protected Southeast homes are very rarely the ones we see with serious termite damage.
How often should I have a termite inspection?
Annual inspections are the minimum for Southeast homes. Twice yearly (spring and fall) is more appropriate for homes with elevated risk factors (heavily wooded lots, moisture issues, older construction, history of prior termite activity). Pre-purchase termite inspections are essentially required when buying or selling a home in our region.
Are DIY prevention methods effective?
Yes for risk reduction, no as a complete substitute for professional treatment. DIY moisture control, debris removal, wood-to-soil separation, and structural maintenance significantly lower the conditions termites need to establish. Professional treatment (liquid barrier or bait system) is what actually protects against active subterranean colonies that exist in your soil regardless of what you do at the surface.
What’s the best way to protect a new home?
New construction in the Southeast benefits enormously from pre-construction termiticide application (the slab and footings are treated before concrete is poured) or physical barrier installation. Ongoing annual inspections and proper landscaping maintenance preserve that protection. Many Southeast builders include the initial treatment, but the long-term maintenance is on the homeowner.
What does a termite inspection actually involve?
A thorough inspection covers the foundation perimeter (interior and exterior), crawl spaces, basements, accessible attic space, plumbing penetrations, exterior wood structures (decks, porches, fences attached to the home), and any moisture issues. Inspectors look for active mud tubes, damaged wood, frass, discarded wings, and conducive conditions. A typical inspection takes 45 to 90 minutes depending on home size.
Most termite damage starts in places homeowners can’t easily see.
Schedule a Termite Inspection Today
If you haven’t had a termite inspection in over a year, you’re seeing any of the warning signs above, or you’re buying a home in the Southeast, Northwest’s team handles the full termite workflow: inspection, treatment selection, application, and ongoing monitoring. Most termite protection programs pay for themselves many times over in avoided damage.
About the Author
Anna V., Editorial Lead — Pest Education leads pest education content for Northwest Exterminating, working with senior technicians and service center managers across our Georgia, Alabama, Tennessee, and South Carolina service areas to translate field expertise into homeowner-friendly guides. The focus: accurate, regionally-specific answers to the pest questions Southeast homeowners are actually searching for.
Jun 20, 2019 | Alabama Blogs, Georgia Blogs, Pest Control
By Anna V., Editorial Lead — Pest Education · Last updated: May 2026
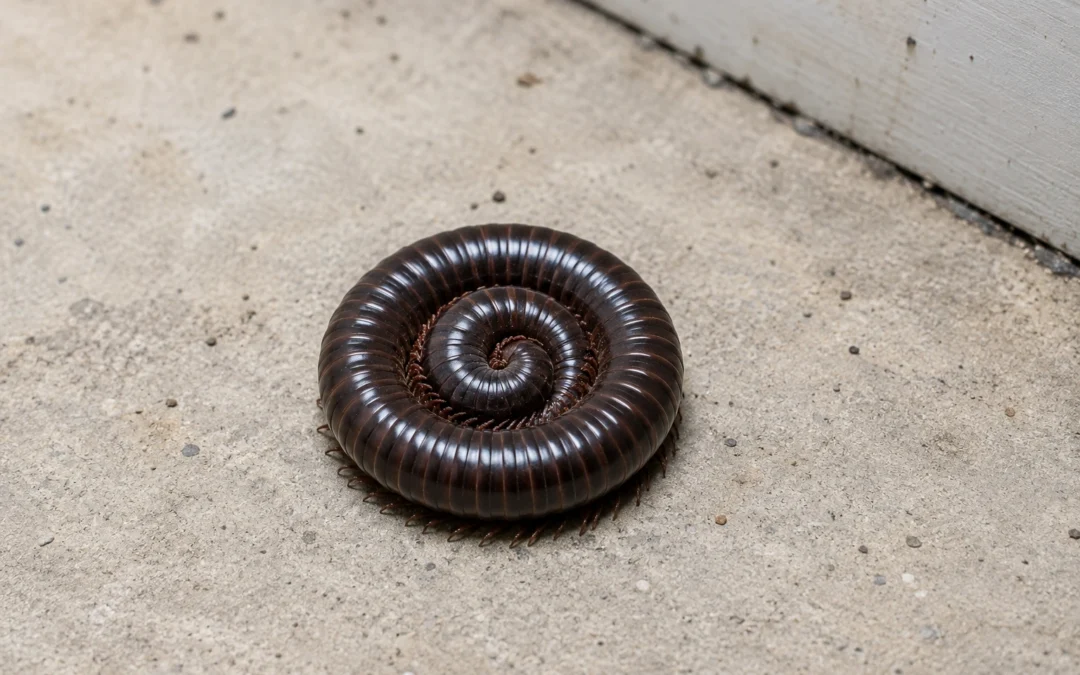
If you’ve walked into your basement or laundry room and found dozens of small, dark, segmented creatures curled up in tight spirals on the floor, you’ve met household millipedes. At Northwest, we get a sharp spike in millipede calls every spring and fall across Georgia and Alabama. The cycle is predictable: heavy rain saturates the outdoor environment where millipedes normally live, they move toward drier ground, and suddenly your basement or crawl space becomes the most appealing real estate in the county.
The good news: household millipedes are completely harmless. They don’t bite, they don’t sting, and they don’t carry disease. The less-good news: when they show up indoors, they usually show up in numbers. Here’s why they end up in Southeast homes, how to tell a millipede from a centipede (a common confusion), and what to do about an active indoor invasion.
What Are Household Millipedes?
Household millipedes are elongated, segmented arthropods with two pairs of legs per body segment. Despite the name (which translates to “thousand feet”), most species have between 80 and 400 legs. They’re typically dark brown to black, about 1 to 1.5 inches long when fully grown, and roll into a tight spiral when threatened.
Three things to know about millipede biology:
- Diet: Millipedes are detritivores. They eat decaying plant matter, leaf litter, rotting wood, and damp organic material. They don’t eat live plants, fabric, food in your pantry, or anything else inside a house.
- Habitat: They need moisture to survive. Outdoors, that means mulch beds, leaf litter, decaying logs, under stones, and the top layer of soil. Indoors, they’re drawn to basements, crawl spaces, bathrooms, and laundry rooms.
- Lifespan: Most species live 1 to 2 years. They’re slow movers, slow reproducers, and not aggressive in any way.
Millipedes vs Centipedes (Don’t Confuse Them)
This is the single most common identification mistake we see homeowners make on millipede calls. The two creatures look superficially similar but behave very differently.
Millipedes are slow, harmless plant-matter eaters. Centipedes are fast, predatory, and can deliver a painful bite.
Quick reference for distinguishing millipedes from centipedes:
| Feature |
Millipede |
Centipede |
| Legs per body segment |
2 pairs (4 legs) |
1 pair (2 legs) |
| Body shape |
Round, tube-like, segmented |
Flat, more ribbon-like |
| Speed |
Slow, deliberate movement |
Fast, darting movement |
| Diet |
Decaying plant matter |
Other insects and small invertebrates |
| Defense |
Curls into a tight spiral |
Runs away, can deliver a mild bite |
| Danger to humans |
None |
Bite can sting, similar to a bee |
If you found something moving slowly, curled up when you got close, and looks tube-shaped, it’s almost certainly a millipede. If something darted away fast on flat legs, it was a centipede. Both can show up in the same conditions (damp basements, leaf litter), but treatment and concern levels differ. For the broader category of misunderstood “creepy” household pests, see our granddaddy long legs guide, which covers another commonly feared but harmless household visitor.
Why Are There So Many Household Millipedes in Your House?
Millipedes don’t choose to be indoors. They end up in homes because the conditions outside become inhospitable and your basement, crawl space, or laundry room offers what they need: moisture and shelter. Four conditions reliably push millipedes indoors in the Southeast:
Heavy Rain or Saturated Soil
The most common trigger for a sudden millipede invasion is a heavy spring or fall rainstorm. When soil becomes waterlogged, millipedes move to higher ground. If “higher ground” is the dry concrete of your basement floor, that’s where they go. We see millipede calls spike within 48 hours of major rain events across Georgia, Alabama, and Tennessee.
Drought or Extreme Dryness
The opposite condition triggers a similar response. During extended dry periods, outdoor environments become too dry for millipedes to survive. They migrate toward any source of moisture, which often means crawling under doors, through foundation cracks, or up basement window wells to find indoor humidity.
Yard Conditions Around the Foundation
Yards that hold moisture against the house make millipede invasions more likely. The biggest contributing factors:
- Heavy mulch beds within 3 feet of the foundation (especially wood chip mulch)
- Leaf litter that accumulates against the house
- Decorative stones or wood timbers laid directly on soil
- Irrigation systems that spray foundation walls
- Downspouts that empty within 2 feet of the foundation
- Stacked firewood, lumber, or yard debris near the house
Indoor Moisture and Cracks
Millipedes can’t enter a house without an opening, and they can’t survive indoors long without humidity. Both have to be present. Common entry points:
- Foundation cracks at grade level
- Gaps under exterior doors (especially garage side doors and basement hatches)
- Unsealed crawl space vents
- Window wells with cracked or missing covers
- Gaps around utility line penetrations
- Weep holes in brick veneer that aren’t screened
Indoor conditions that let them stick around once inside: damp basements, leaking pipes, condensation on cold water lines, poor ventilation in crawl spaces, and standing water in floor drains.
Signs of a Millipede Presence
Most homeowners notice millipedes because they see them directly. Other signs to watch for:
- Live sightings on basement or crawl space floors, especially after rain or in early morning hours.
- Curled-up “dead” millipedes in dry indoor environments — the spiral defense posture also happens when they die from dehydration indoors. Finding several curled millipedes in a basement corner is a sign that more are entering and dying.
- Movement after rain. If you see a single millipede the day after a thunderstorm, you’ll probably see more over the next 48 hours.
- Clusters near damp areas like basements, laundry rooms, bathrooms, and crawl space access points.
- Shed exoskeletons in undisturbed corners, which suggests an established indoor population rather than just visitors.
Are Household Millipedes Harmful?
No. Household millipedes do not bite, sting, transmit disease, damage structures, contaminate food, or harm pets. They are completely harmless to humans and pets.
Three small caveats:
- Defensive secretions. Some millipede species release a mild liquid when handled or threatened. The secretion can stain skin briefly and irritate eyes if rubbed in. Wash hands after handling any millipede. Don’t let pets eat them in large numbers — the secretion can cause mild mouth irritation in dogs and cats.
- Allergic reactions. A small percentage of people have allergic skin reactions to millipede secretions. Reactions are mild (redness, itching) and resolve quickly.
- Dead millipede smell. Large numbers of dead millipedes in basement corners can develop a faint, unpleasant odor as they dry out. Vacuum them up promptly.
The UGA Extension Bulletin B 1412 on Southeastern household pests classifies millipedes as a “nuisance pest” — uncomfortable to encounter but not harmful.
How to Prevent Household Millipedes
The most effective millipede prevention works on three fronts: outdoor conditions, entry points, and indoor moisture.
A 3-foot mulch-free zone around the foundation is the single highest-impact millipede prevention move for most Southeast homes.
Outdoor Conditions
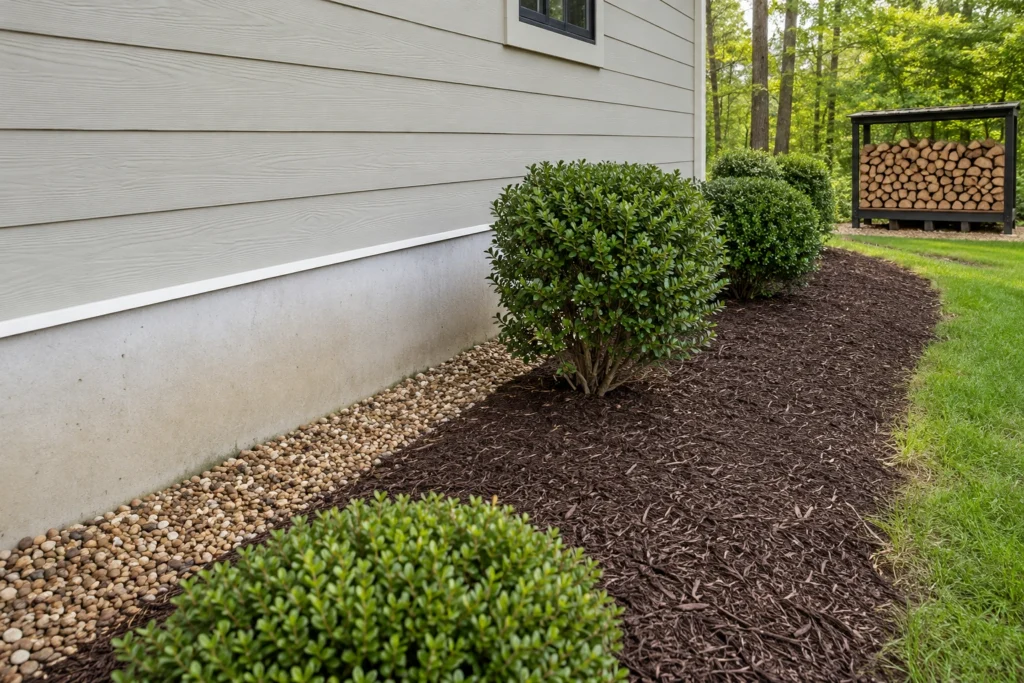
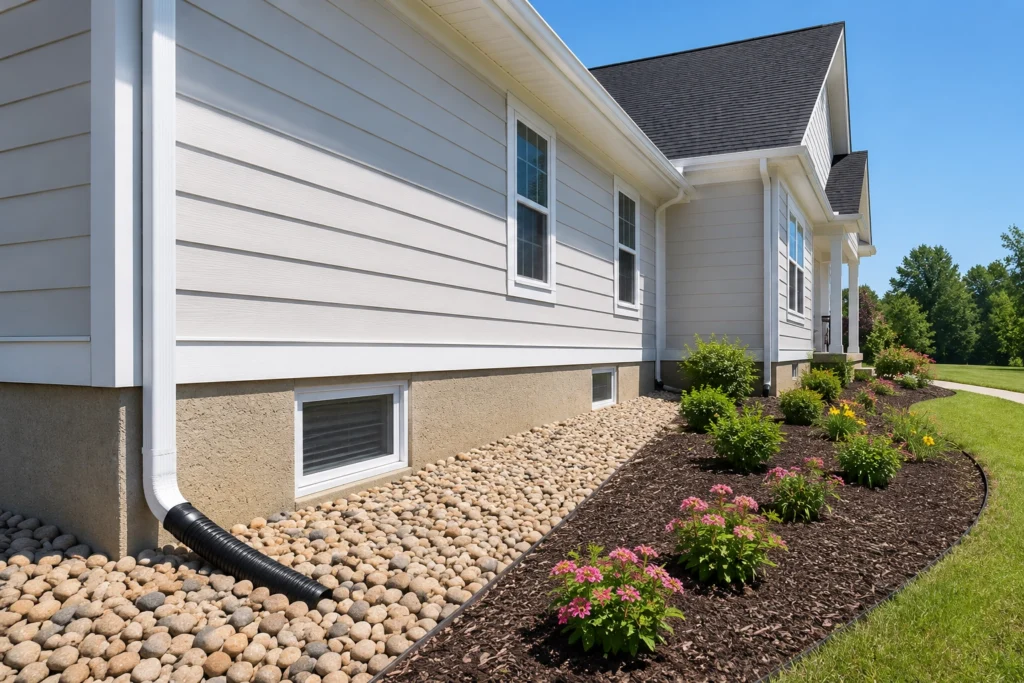
- Keep mulch beds at least 3 feet from the foundation. If you have mulch right against the house, that’s the single biggest contributor to millipede invasions. Replace the foundation perimeter with gravel, river rock, or bare soil.
- Remove leaf litter from the foundation line. Rake regularly during fall and after storms.
- Move firewood, lumber, and debris piles at least 20 feet from the house.
- Direct downspouts and irrigation away from the foundation. Pooling water within 2 feet of the house is millipede paradise.
- Trim shrubs back so air can circulate against the foundation. Damp, shaded foundation walls hold millipedes longer.
Seal Entry Points
- Caulk foundation cracks at ground level.
- Install or replace door sweeps and weatherstripping, especially on garage doors and basement hatches.
- Screen crawl space vents with galvanized 1/4-inch hardware cloth.
- Cover window wells with rigid plastic or metal covers.
- Seal gaps around utility line penetrations with steel wool and caulk.
Indoor Moisture Control
- Fix leaky pipes promptly. Even small leaks support indoor millipede populations.
- Run a dehumidifier in basements and crawl spaces.
- Improve ventilation in bathrooms and laundry rooms.
- Don’t store cardboard boxes directly on damp basement floors.
How to Get Rid of Household Millipedes
Once millipedes are already inside, the treatment approach is straightforward.
DIY Methods
- Vacuum them up. A regular vacuum with a hose attachment handles individual millipedes quickly. Empty the canister or bag outside afterward.
- Sweep into a dustpan. Slower but works for small numbers.
- Reduce indoor humidity. A dehumidifier in active areas often resolves an indoor population within a few weeks. Without moisture, millipedes can’t survive indoors.
- Skip insecticide sprays. Indoor sprays don’t work well on millipedes because they don’t stay in one place long enough to absorb the active ingredients. Sprays also leave residue that’s unnecessary for a harmless pest.
For ongoing prevention while you address the conditions, see our companion guide on natural ways to remove and prevent millipedes in your house.
When to Call Northwest
Most millipede problems clear up once you fix the outdoor conditions and seal the entry points. Call us if:
- Indoor sightings continue for more than 2 weeks despite your prevention efforts.
- You’re finding more than 10 to 15 millipedes per day in any single room.
- You can’t identify the entry points and want a professional inspection.
- You’re dealing with millipedes plus another pest (centipedes, sowbugs, springtails). All share the same moisture-driven entry pattern and can be solved together.
(Persistent millipede problem? Schedule a free Northwest inspection and we’ll find the entry points and address the moisture issues driving them indoors.)
Household Millipedes & Local Environmental Factors
Millipede pressure in Georgia, Alabama, Tennessee, and South Carolina is consistently higher than in drier or colder regions. Three Southeast-specific factors:
- Humidity. Long humid summers create constant indoor and outdoor moisture, which sustains millipede populations year-round.
- Heavy spring and fall rains. The Southeast’s two rainy seasons drive the two annual peaks in indoor millipede sightings.
- Construction patterns. Many Southeast homes have crawl spaces and slab additions with foundation features (cracks, vents, soffit gaps) that are reliable millipede entry points.
The good news: the conditions that attract millipedes also attract other “moisture pests” (sowbugs, springtails, centipedes, sometimes ground beetles). Fixing the conditions for millipedes generally fixes the conditions for all of them at once.
Frequently Asked Questions About Household Millipedes
Do millipedes bite?
No, household millipedes do not bite humans or pets. They have no biting mouthparts capable of penetrating skin. Some species release a mild defensive secretion when handled, which can briefly irritate sensitive skin. Wash hands after handling.
Are millipedes attracted to lights?
Not typically. Unlike many flying insects, millipedes don’t navigate by light. They’re drawn to moisture, organic matter, and dark sheltered spaces. If you’re seeing them near lights, it’s usually because the lighted area happens to have moisture or shelter nearby, not because of the light itself.
Will household millipedes go away on their own?
They can. If the outdoor conditions that drove them indoors change (rain stops, drought ends, mulch dries out), most millipedes will leave or die from dehydration within a few days. However, large indoor populations or homes with persistent moisture issues usually need active intervention to fully clear.
How long do household millipedes live?
Most household millipede species live 1 to 2 years in the wild. Indoors, they typically don’t survive long without consistent moisture access. The “dead millipede” curls you find in dry basement corners are often individuals that entered seeking moisture and dehydrated before finding any.
What’s the difference between a household millipede and a centipede?
Millipedes have 2 pairs of legs per body segment, move slowly, eat decaying plant matter, and curl into a spiral when threatened. Centipedes have 1 pair of legs per body segment, move fast, are predatory (they eat other insects), and can deliver a mildly painful bite. Both can show up indoors in similar conditions, but only centipedes warrant any caution.
Most millipede problems get solved by fixing the outdoor conditions and sealing the entry points — not by spraying inside.
Stop the Millipede Problem at the Source
If household millipedes keep showing up in your basement, laundry room, or crawl space, the answer almost always lies outside the house. Northwest’s team handles the full millipede workflow: identifying the moisture and entry-point conditions driving them in, sealing the access points, and addressing any underlying drainage or humidity issues. Most homeowners are surprised how much of the work happens around the foundation rather than inside.
About the Author
Anna V., Editorial Lead — Pest Education leads pest education content for Northwest Exterminating, working with senior technicians and service center managers across our Georgia, Alabama, Tennessee, and South Carolina service areas to translate field expertise into homeowner-friendly guides. The focus: accurate, regionally-specific answers to the pest questions Southeast homeowners are actually searching for.