READY TO GET STARTED?
REQUEST A FREE ESTIMATE
Fill out the form below or call (888) 466-7849 for a free, no-obligation estimate.
This unseasonably hot weather has catapulted us straight into summer. If you have found yourself making multiple trips back and forth to your thermostat, it may be time to look into improvements around your home that not only stop the multiple trips but also save you money in the end.
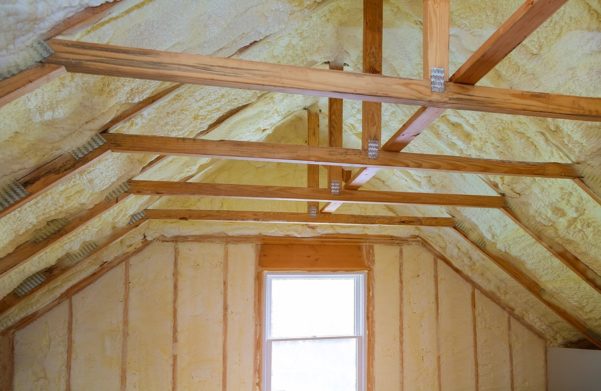
With the sun beating down on the roof of your home with little to no cloud cover, your attic will easily see high temperatures during the summer. Without proper insulation, the heat will absorb through the hard materials that make up your home, leading to unbearable temperatures inside.
Proper attic insulation will create air pockets which slow the heat attempting to flow through your home. This will help uneven temperatures between the rooms in your home and lessen the need to consistently visit your thermostat.
High heat and humidity have caused your home to become muggy and intolerable. The humidity and moisture can also become a welcoming environment for mold, fungi, and pests.
Investing in the encapsulation of your crawl space could not only save you money on your energy bills, but also prevent a headache in the long run. Termites thrive in areas of high moisture, putting your home at risk for structural damage. Not only will this method act as pest control, but it can also improve the air quality of your home and create more comfortable living conditions for you and your family.
Still on the fence? Give us a call to schedule your free inspection today, and one of our licensed professionals will answer all of your questions.
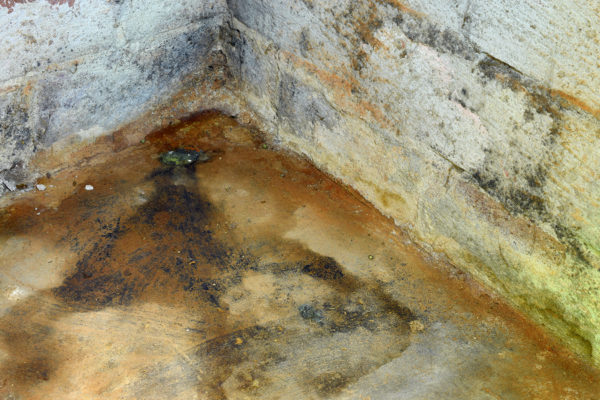
If you’re like most of us you don’t spend too much time inspecting your crawlspace. But did you know that moisture that makes its way into your crawlspace can cause significant problems not only for your home but for your health, as well? Dampness in your crawlspace is a common problem in homes without a proper moisture barrier system. Without a proper barrier, your crawlspace carries humid air that condenses and settles on the pipes, walls, and even the subflooring. This moisture provides the ideal environment for mold, mildew, and pests. A moisture barrier prevents this moisture from evaporating and seeping into the air beneath your home. Moisture barriers are composed of either foil or plastic material that helps prevent moisture from penetrating your crawlspace air.
So why should you have a moisture barrier installed in your crawlspace? Check out these 7 benefits of moisture barrier installation.
The moisture that gets into your crawlspace affects the temperature in your home. It can make your home too hot, too cold, too stuffy, or too dry depending on the weather, the season, and other factors. The moisture either absorbs the warmth from your house or keeps it from escaping. In turn, this causes your HVAC unit or furnace to run too long trying to maintain a steady temperature indoors. Installing a moisture barrier seals those spaces and keeps the moisture out of your crawlspace, helping to regulate the temperature inside.
As we mentioned above, the moisture in your crawlspace can affect the temperature inside your home. As your HVAC unit or furnace runs longer to help maintain the temperature inside, it uses more electricity which, in turn, increases your electricity bill. This also puts additional strain on the HVAC unit, causing them to wear out faster and need costly repairs and/or replacement. A moisture barrier acts as a sealant, controlling the moisture levels and easing the strain of your HVAC system, making your home more energy efficient and saving you money on your energy bills.
High moisture levels in your crawlspace provide the ideal environment for mold and mildew growth. Mold and mildew in your air system can be detrimental to your and your family’s health. Mold can also cause significant damage to your home. Installing a moisture barrier greatly reduces these moisture levels, preventing mold and mildew from forming. Mold and mildew are often the cause of foul odors in your home, as well. A moisture barrier can also help eliminate these stale, musty odors from your house.
Your crawlspace is home to a number of pipes that supply both water and power to your home. When moisture infiltrates your crawlspace, it can cause rotting inside and around these pipes, leading them to burst or break. Moisture barrier installation helps keep your pipes dryer, which increases their lifespan and decreases costly repairs.
As we mentioned above, many of the pipes in your crawlspace house electricity that runs to your home. Moisture and electricity don’t mix! Moisture in and around these pipes can lead to electrical shorts, rusted wires, and even fire. Installing a moisture barrier eliminates the moisture that can infiltrate these pipes, keeping your home safer from electrical hazards.
The foundation of your home is vital to its structure and soundness. Moisture in your crawlspace can lead to wood rot, especially on joists and beams. Rotting wood can lead to significant structural damage to your home which can, in turn, stick you with a huge repair bill. Moisture barrier installation reduces the amount of moisture in your crawlspace which helps prevent wood rot, protecting the structural integrity of your home.
Your unsealed crawlspace is an open invitation to pests and wildlife in search of shelter, food, and water. Once inside, these pests can cause significant damage to your home and your health. Rodents and other wildlife can chew through wood and electrical wires. Roaches and other insects can use the crawlspace to gain access to your home, posing potential health risks to you and your family. Installing a moisture barrier completely closes off your crawlspace, eliminating this entry point for pests into your home.

Fall is the perfect time of year to prepare your home for winter. While prepping your yard and storing away your summer things are usually at the top of the list, don’t forget to protect your home from pests this winter also! Fall is prime time for pests to make their way into your house in search of food, shelter, and warmth over the cold winter months.
Rodents will make their way indoors in search of a warm place to shelter for winter. Flies will often be found on the south and west facing walls of your home in search heat. Many stinging insects like yellow jackets, bees, and wasps will become more hostile in the fall as their food supply dwindles. Cockroaches are attracted by the moisture found in and under your home. Other pests like ants, stinkbugs, ladybugs, and box elders will come inside looking for a place to overwinter.
Now that you know what kinds of pests to expect this fall, what can you do to protect your home from these often unseen invaders? Check out these 6 tips to prevent pests this fall.

Summer brings hot temperatures and high humidity. It also brings some of the most annoying pests – fleas and ticks. These parasites can cause significant health issues for your pets including Lyme disease, anaplasmosis, and ehrlichiosis. Fleas and ticks are practically impossible to keep at bay and can take weeks to months to get under control. What can you do to protect your pets from these parasites? Check out these 8 tips to prevent fleas and ticks from taking over your pets and your home.
If you suspect a flea or tick problem, call a professional pest control company who can come and thoroughly inspect your home and yard and provide you with a comprehensive treatment and prevention plan.
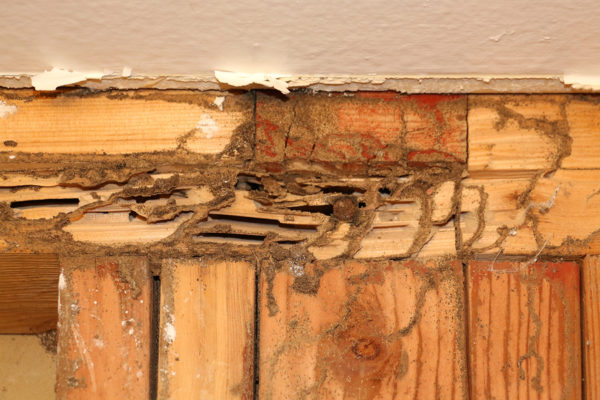
If you’ve been outside lately you’ve probably seen signs of spring – blooming flowers, pollen that aggravates our allergies, and lots of new insects buzzing around. Another thing that spring brings is swarms – of termites! Termites are present year round but their swarming season is during spring and early summer.
Termites cause billions of dollars in damage to homeowners each year. Here in the Southeast, subterranean termites are the most common types and are particularly destructive. These insatiable eaters can damage not only wooden structures, but have even been known to cause damage to brick and concrete homes as well. Termites can invade your home through cracks and holes as small as 1/32 of an inch!
Swarms are most common in spring and summer because they are triggered by warm, humid weather. Swarming marks the start of a new termite colony. Winged termites leave their nests when they become overcrowded and their isn’t enough food to sustain them. They then take flight and actually reproduce in mid-air. The females will then shed their wings and fall back to the ground. They then go in search of a new location to start their colonies.
Swarmers don’t usually cause any damage but once they establish their new colonies their offspring can cause significant damage – usually within 2 years. If you see flying termites it can signal one of two problems:
If you see winged termites inside your home this is a good indication that you already have an established termite colony inside or that there is existing damage already.
What can you do to prevent termites from coming into your home? Check out these tips to keep the termites out!
As always, if you suspect you have termites or find signs of damage, contact a termite control company who can come in and do a thorough inspection and set you up with a comprehensive treatment plan.